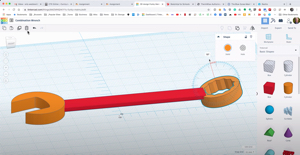
 Modeling the combination wrench in Tinkercad has been a popular lesson, so I made a follow-up video on the steps I used to print it.
Offered By Eric Westland And Fresno Pacific University
 Modeling the combination wrench in Tinkercad has been a popular lesson, so I made a follow-up video on the steps I used to print it.
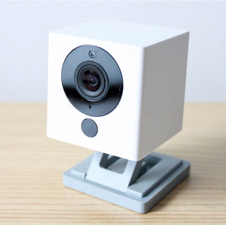
 Being able to monitor your 3D printing job remotely is important, and fun. Some 3D printers come with a camera built-in, but mine didn’t, so to add one, I started with a webcam like you would use with Skype. The picture was OK, but if I wanted video in 1080p, a new webcam with that resolution was going to be at least $50.
I had a Wyze Cam v2 laying around and wondered if I could use that for monitoring in 1080p HD? I had previously set it up for my printer, but the only way you could view it was via the Wyze app, and that only works on a smartphone and I wanted more detail. For $19.99 and a little work, this is a great setup. Here’s what I did:
Now that your Wyze Cam is a USB webcam, you can monitor the video feed with a variety of free applications. Your OS likely already has one built-in like Windows Camera or Mac Photobooth.
I went one step further and installed Octoprint on a Raspberry Pi. This allows me to view the video feed on my computer, records a timelapse video, and with the Octopod plugin, I can monitor and control my print job remotely. More on that later.
 Here’s a fun STEM activity using Tinkercad, Autodesk’s free web-based 3D modeling program. Tinkercad is an amazingly easy-to-use, powerful program for creating 3D digital designs that are ready to be 3D printed, incorporated into projects, or solve design challenges. This FREE collection of online software tools help people all over the world think, create, make, and Tinker! For teachers, it integrates easily with Google/Tinkercad Classroom and is 100% cloud-based, meaning it will operate on any device that can run a web browser, including Chromebooks and iPads.
For teachers interested in a Tinkercad class for continuing education credits, take a look at STEM-910, Teaching With Tinkercad. https://ce.fresno.edu/educator-courses/stem-910
 The Douglas DC-3 (the military version was the C-47) first flew in the 1930s, made commercial passenger flight affordable, flew in many wars, and still flies today.
Coming soon will be the screencasts for completing this project and they will be published on my YouTube channel. Like many of my projects, this one is:
I’ll post the link for the screencasts here once they are released. If you want to be notified, do the usual YouTube subscribe thing and click on the bell 🙂
Here is the link for the  DC-3 Blueprint we will use when modeling.
This is just how I do it for my workflow. Some folks like a ton of icons, I prefer to keep it simple.

Actual software applications usually cannot be installed on a Chromebook, which usually means that editing video has to be done in the cloud, like at wevideo.com, which was neither free nor convenient for schools and students.
With the advent of being able to install some Linux apps on Chromebooks, developers have bundled together some Linux open-source applications that can easily be installed (You don’t need to know Linux) via Flatpak.
There are several choices, but my favorite is OpenShot. It is a typical non-linear video editor that students can learn easily. It even comes with a nice library of transitions and effects.
You are not going to be able to edit the next Star Wars movie with it on a Chromebook, but for presentations, science experiments, debates, book reports – you name it – it provides the best option for editing video on a Chromebook.
Here is how to install it on a Chromebook:
 This is the video that I mentioned earlier on improving your videos by stepping-up your audio. It is impossible for me to provide a one-step-fits-all solution, so consider this a start and if you have questions or want a recommendation, please let me know.
BTW, here are some links to some of the gear I mentioned. I don’t make any money off them, it’s just what I use myself. With tariffs, COVID and so many people looking to improve their audio for online meetings, prices have been higher this last year, but they are getting better slowly. Some products are also back-ordered.
Sony Lavalier Mic. Some mics require power, others don’t. To avoid getting the wrong mic, choose one with free returns. If your computer supports a mic 3.5mm input, this may be all that you need.
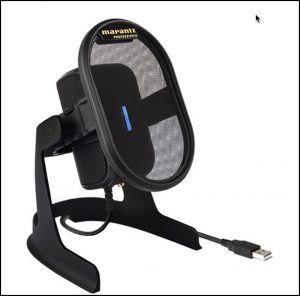
Blue Yeti USB Mic. I used one of these for 2-3 years and loved it until it stopped working. Maybe I just got a bad one, but I replaced it with an AT2020 condenser mic and use a USB interface to connect it to my computer.
This is the USB mic I showed and I thought it was no longer made. What I forgot was that they really jumped the price. I used to get them for $20. It’s worth a little more than that, but not $100. There are many choices for that price or less that are waaaay better.
If you have a question or comment, please reply here so all may benefit. There should also be a link in this email to unsubscribe.
-ew
iMovie is Apple’s free video editing program for Macs, iPads and iPhones. It is very easy to learn and integrates very well with all Apple devices, yet also has many advanced features for easily creating captivating video content for educational and personal use.
No previous experience is required for this course. Students will intuitively proceed through each lesson, creating appealing and engaging video content that can be used in their instruction the same day. Methods for sharing videos in almost any forum/format will also be discussed.
Students will need a Macintosh computer for the course so we can explore iMovie’s features, but we will also cover how you can use iMovie on iOS devices such as iPads.
Sample Lesson From The Course
Discover how you can use the Apple hardware you already use daily to create, educate, communicate and inform, all while having fun and maximizing your creativity.
Save Up To $45!
Use this code to save $15 per course: Eric45
[mc4wp_form id=”316″]
 Up until recently, editing RAW camera images on a Chromebook has not been possible. However, two RAW editors are now available – Raw Therapee and Darktable. Both are very powerful and can now be installed on a Chromebook. Of the two, both can do everything I could ever want to do, but I prefer Raw Therapee simply because it is easier to use, at least for me.
Here is how to add RawTherapee to your Chromebook.
At first, it may look intimidating to use, which is understandable as it can do so much, but the basics are easy to access. These two YouTube guides will convince you in less than 15 minutes that if your students are using Chromebooks, RawTherapee is something you will want to include in your lessons.
 Loom is an online screen recording program from Google. While the online version does a nice job, if you have a Mac or PC, you can install an application that will give you more features.
Loom does a nice job recording your screen and narration and then stores your screencasts in the cloud for easy sharing. It comes with a basic editor, but if you want to spruce up your project, you can download the file as a .mp4 and edit it in your favorite free editor like HitFilm Express.
As of the spring of 2020, the Pro version of Loom is now free, for teachers, forever. That is tough to beat for free, so I encourage you to give it a test drive.